Heres some test i did with PFtrack a program that my colleague Arren which has made
colleague
I found thi program very usefull with in tracking my scenes
Thursday, 24 February 2011
Wednesday, 23 February 2011
storyboarding time
I began storybaording potentials ideas
I first came up with the idea of the having a bus being chases but I didn't complete the stroyboard cause its seem impossible to film.
The second idea I came up with was having a plane falling from the sky wit everyone on it panicking. also I had a little bird being chased by the plane and then getting sucked up in to one of the engine of the plane. Then coms out the other end as a bucket of KFC
I had another idea where you have a man on a unicycles trying to carry a number on different idea whilst on a tightrope.
I then had the idea of having a man who begins with a man reading a new paper. to then receiving a telephone call from his wife demanding him to get the shopping in. so he fanatically drive down to the shop and gets the shopping. After completing the shopping he return the trolly however he manages to fall in to the trolly and and slide down a hill very fast dodging difference obstacles.
i feel that this has some potential I will further develop it.
I feel this idea had some potentials and so i wanted to move forward with it
Motion track with in after effects
I first look online for a tutorials for motion tracking on after effects
I found this very interested and it help me to inform my work

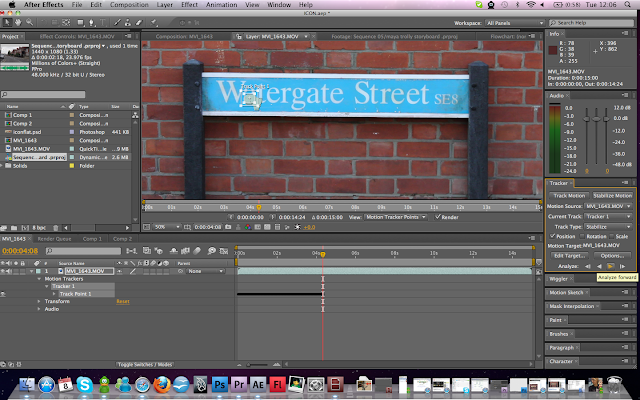


Here a little test i did with in after effects with our group icon
I found this very interested and it help me to inform my work


Here a little test i did with in after effects with our group icon
Tuesday, 8 February 2011
Green scene tests with in after effcts
I first got a friend of mine to stand on a green in my mate garage and put two 10 kilowatts work light on both side of the green screen and then put the actor in front
I then put the footage in to the program adobe after effects

I then put the footage in to after effects and then was told by my tutor Alex Hulse that there is a plug-in with adobe after effect

I then need to create a mask in to the scene the cut of the background of the garage.

i then move the mask and tried to animate in insynce in and around the model


I then began do some color correction with in the video so I can make it blind in with the back ground.
I then used the tint the and gave it a blue tone

i then put a clour in front of the actor and heavily blurred out it out. In an attempt to

First pass of green scene test
Wednesday, 26 January 2011
post production
I First research in to film that had a lot of
Researching in to filming with compositing and digital effects
Titanic
http://www.youtube.com/watch?v=CkJ1FqnUS0o
I found this quite mind boggling
I then look at composting 2d and 3d animation together
It is very interesting to see how the technology how progress over the year and how we use this for granted.
I began to research in to Who framed Roger rabbit.
I looked in to how how they manage to composite this with out the mean of digital manipulation.
Research in to filming optical printers
I then began to look in to how they created the spacial effects in the film Merry Poppins and how i could try and use this to inform my work
I then had a look in to Research in to filming optical printers
I found a documentary
I then found this very modern children's Tv program call Little Howard's big question. I found this very delightful to watch.
superman research
I then did a little test of out group logo that Gary lovely made for our group.
Friday, 14 January 2011
researching in to Leonard Da vin ic
I began to start
Here the documentary
I have decision to recreate a mock up of the Da Vinic tank to help me better improve my modelling skills
to get ready for
I will try to re create it step by step from the documentary as best as i can.

i recreated this is maya by simple getting a pipe shape and scale it so it was very thin and
got some cubes and scale them accordingly to the design


Within building the weals i very simple go a pipe shape and make the hold of the pipe very small then inserted a lot of small cylinders around the weal


step 4 making the barrel gears. The barrel gear transfer the power from the crankshaft to the main weals


I then combined the cylinders to the weals weals ( I know these weals look different to the ones before the reason for this is that maya crashed. as a result of this i made new weal not realising that they where completely wrong. it is documented that I changed theses correctly later on.)

After that I place the weals in the base that I made earlier


I then started to model and lay out layout where the crankshafts is and


maya problems
For some reason when I combined the barrels gear to the crankshaft they don't move in correlation with each other. I ask a fellow colleague of mine Arran why this was doing it. He told me it was due to the anchor point


Here the weals
I suddenly realize i made mistake and put a different set of weal in the base with out realizing so i corrects this by change them accordingly.


I then placed the barrel gear in to place in correlation to the weals


I then created the floor plane of the tank

i then put the weal hold shot in to place so the weal don't fall off.

I then started to model the top part of the tank with


For the inside of the shell I needed to make more supports i did the same as i did with the outer shell

I made another tube and extrude every other shape


I then stared to model some basic cannons


I then cover the body with a hollowed out shell

Here is a 360 of the tank so far.
I then stared to colour in the tank
I simple just assigned new materials to the abject and assigned it to a lambert.


tank
My tutor Jared taylor sergusted to research in to Leonard Da Vinic due the the cogs in the design of the windmill.
When i was researching on youtube i found this brilliant documentary online entitled Doing da vinic
Where team of highly skilled builder recreating Da vinic invention from his own drawing back 500 years ago. This show you step by step how they where built.
I have decision to recreate a mock up of the Da Vinic tank to help me better improve my modelling skills
to get ready for
I will try to re create it step by step from the documentary as best as i can.
stage one
here is a scene of the base of the tankstill from doing a vinic on some kind of cad system
got some cubes and scale them accordingly to the design

Step 2 making the weals
Within the tank design the weals our quite large.
Within building the weals i very simple go a pipe shape and make the hold of the pipe very small then inserted a lot of small cylinders around the weal

stage3 bulting a slots to hold the weal of the than


theses go on the side of the weal to support the weals and also allowing it to weals to move accordingly
After that I started making the barrel gear.
Within making this object I just got 2 cylinders and then flatten them to a and point. After that I got another cylinder and stretched it out and made it very thin tube

I then combined the cylinders to the weals weals ( I know these weals look different to the ones before the reason for this is that maya crashed. as a result of this i made new weal not realising that they where completely wrong. it is documented that I changed theses correctly later on.)

After that I place the weals in the base that I made earlier

I then placed the gears barrel

I then started to model and lay out layout where the crankshafts is and

Still from Doing Da Vinic
I started to next model the top part of the windmill


I started to make there top bady shell of the of the tanks what i did was to get a tube shape and then went on to face mode selected every other face and then extrude the out and scale them in woulds after.


maya problems
For some reason when I combined the barrels gear to the crankshaft they don't move in correlation with each other. I ask a fellow colleague of mine Arran why this was doing it. He told me it was due to the anchor point


Here the weals
I suddenly realize i made mistake and put a different set of weal in the base with out realizing so i corrects this by change them accordingly.

I then started to make the support for the weals and the base of the tanks


I then placed the barrel gear in to place in correlation to the weals


I then created the floor plane of the tank

i then put the weal hold shot in to place so the weal don't fall off.

I then started to model the top part of the tank with

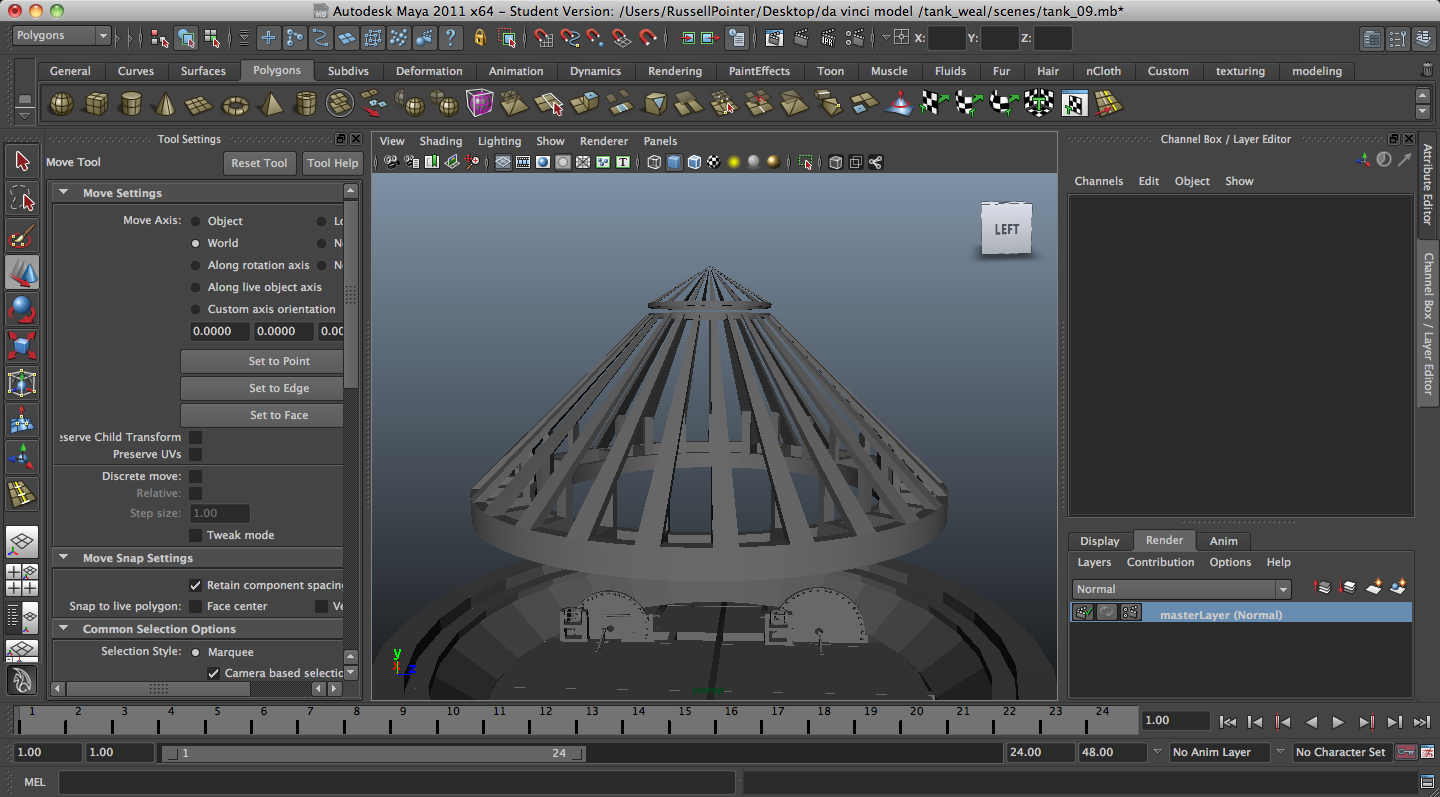
For the inside of the shell I needed to make more supports i did the same as i did with the outer shell

I made another tube and extrude every other shape


I then stared to model some basic cannons

It consists of a cylinder a stretched sphere and a pipe shape smoothed.


I there place the cannons around the tank by putting the anchor point dead centre of the tank and simple just rotating it.


Here is a 360 of the tank so far.
I then stared to colour in the tank
I simple just assigned new materials to the abject and assigned it to a lambert.


Subscribe to:
Posts (Atom)